Based on my research, the top three gel nail kits for beginners are JODSONE’s 32-color set with a UV light, JODSONE’s expanded 60-color kit, and GAOY’s beginner-friendly gel kit with a UV lamp. These kits offer easy application, a wide range of shades, and beginner-friendly tools to help you achieve salon-quality nails at home. Keep exploring to find out which kit best fits your style and needs for perfect at-home manicures.
Key Takeaways
- Look for kits with comprehensive color options, user-friendly tools, and clear instructions suitable for beginners.
- Ensure the gel formulas are safe, low odor, and contain nourishing ingredients for healthy nails.
- Choose kits with portable, easy-to-use UV or LED lamps that offer multiple curing modes and timers.
- Proper nail preparation and application techniques are essential for long-lasting, salon-quality results at home.
- Read customer reviews to verify ease of use, durability, and overall value for beginner-friendly gel nail kits.

JODSONE Gel Nail Polish Kit with U V Light 32 Colors Gel Polish Nail + 4 Functional Adhesive Bottles Kit Soak Off Manicure Tools Gifts for Women
36 PCS Gel Nail Polish Set: This is a gel nail kit with super multi-color gel nail polish.It...
As an affiliate, we earn on qualifying purchases.
JODSONE Gel Nail Polish Kit with UV Light (32 Colors)
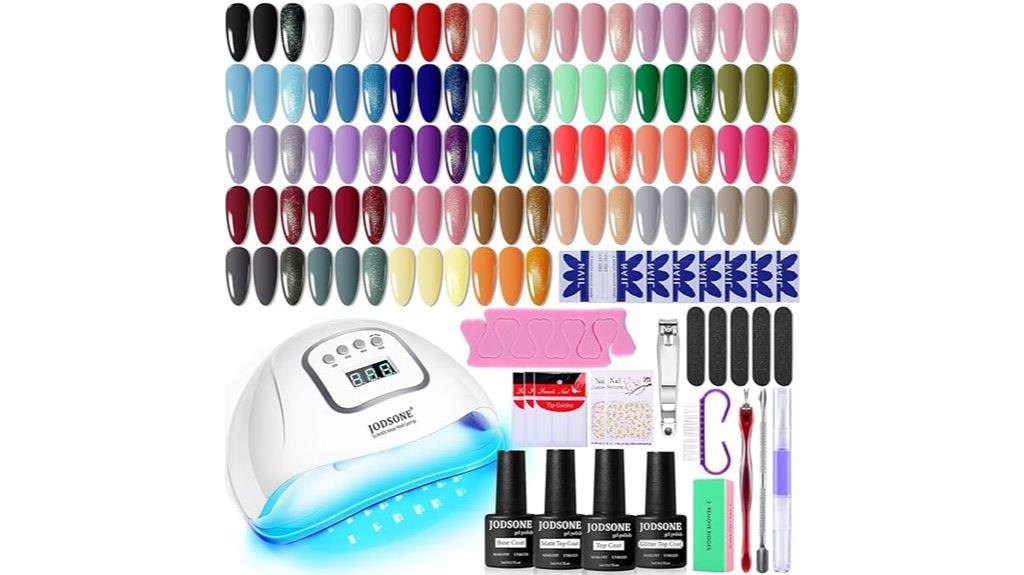
Are you new to gel nails and wondering if you can achieve salon-quality results at home? The JODSONE Gel Nail Polish Kit with UV Light offers everything you need. It includes 32 vibrant colors in classic shades, plus base coat, no wipe, matte, and glitter top coats. The kit also features a professional UV LED lamp with smart sensors and multiple timers, ensuring perfect curing every time. With nine healthy ingredients, the polish is safe, low odor, and long-lasting—lasting over three weeks with proper application. Whether you’re a beginner or looking to experiment with nail art, this kit makes professional-quality manicures simple and fun.
Best For: beginners and home users seeking professional-quality gel nail kits with diverse colors and easy application.
Pros:
- Includes 32 vibrant gel polish shades along with essential top coats and tools for complete manicure options.
- Equipped with a professional UV LED lamp featuring smart sensors and multiple timers for efficient curing.
- Safe, low odor formula with nine healthy ingredients, ensuring durability and long-lasting results over three weeks.
Cons:
- Requires curing under LED light, which may be a learning curve for complete beginners.
- Color variations might occur depending on lighting conditions and display screens.
- The kit may be less suitable for professional salon use due to its home-focused design.
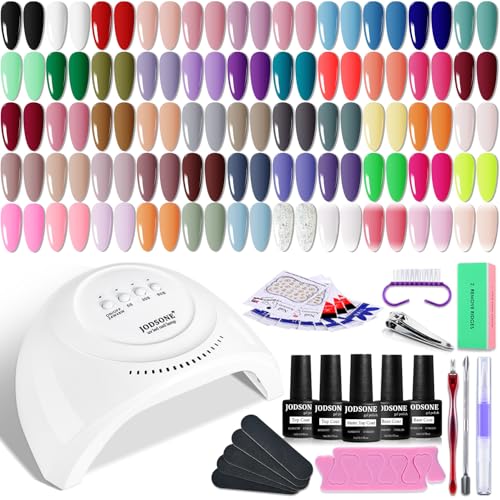
JODSONE Gel Nail Polish Kit 60 PCS with U V Light Soak off Base Top Coat 55 Shine Colors Gel Nail Kit Bright and Dark Brown Wine Red Series Manicure Set for Women and Girls
Gel Nail Polish Kit: The set contains 55 bottles of colored gel nail polish(5ml each bottle), two bottles...
As an affiliate, we earn on qualifying purchases.
JODSONE Gel Nail Polish Kit with UV Light and 60 Colors
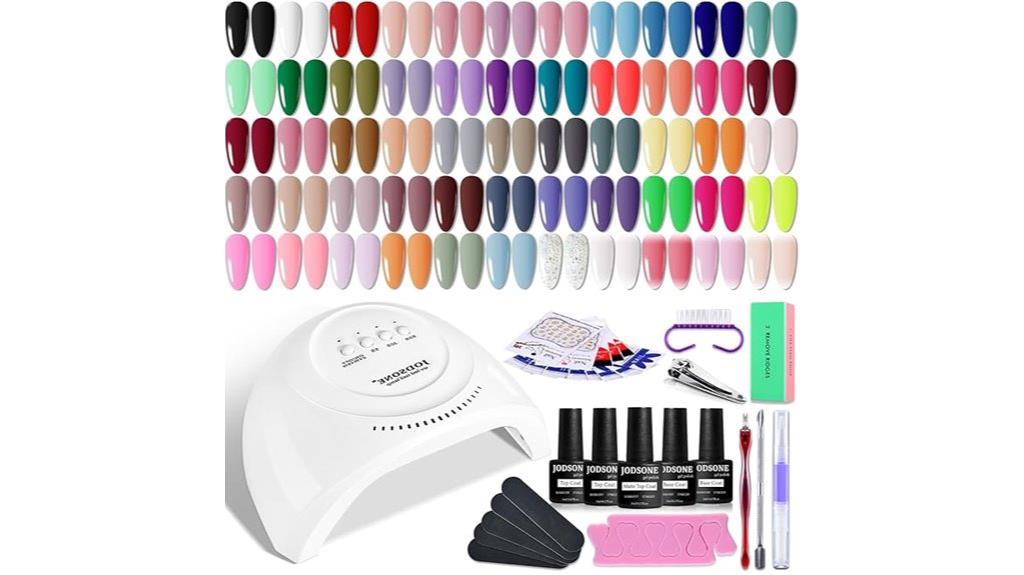
The JODSONE Gel Nail Polish Kit with UV Light and 60 Colors stands out as an ideal choice for beginners who want professional-quality results at home. It includes 55 vibrant gel polish bottles, ranging from bright hues to dark browns and wine reds, plus two base coats, two glossy top coats, and a matte top coat. The smart nail lamp offers three curing modes—5s, 30s, 60s—and automatically turns on with a sensor, ensuring quick, even curing. With high shine, durability up to 21 days, and easy application, this kit combines safety, versatility, and convenience, making it perfect for creating salon-quality nails at home.
Best For: beginners and at-home users seeking professional-quality, long-lasting gel nails with a versatile color range and easy application.
Pros:
- Includes 60 vibrant colors and essential manicure tools for versatile styles
- Equipped with a smart UV lamp featuring 3 curing modes and automatic sensor for quick, even curing
- Offers high shine, durability up to 21 days, and safe, natural ingredients suitable for all users
Cons:
- Slight color variation may occur due to different display settings and lighting conditions
- Requires proper curing instructions to achieve optimal results
- Limited to at-home use; may not suit professional salon environments for large volume applications

GAOY Gel Nail Polish Kit with UV Light for Beginners, 6 Colors Sheer Nude Red Pink Brown, Gel Polish Kit with Top and Base Coat for Salon and Nail Art DIY at Home, Rose Garden
Gel Nail Polish Starter Kit: It comes with everything you need to get gorgeous and long-lasting gel manicures...
As an affiliate, we earn on qualifying purchases.
GAOY Gel Nail Polish Kit with UV Light for Beginners

If you’re new to gel nails and want an easy, all-in-one kit, the GAOY Gel Nail Polish Kit with UV Light is an excellent choice. It includes six trendy colors like nude, red, pink, and brown, plus a mini UV LED lamp for quick curing. The kit also offers a top coat, base coat, and essential manicure tools, giving you everything needed for professional-looking nails at home. To get the best results, prepare your nails properly, apply two coats of polish, and finish with the top coat for shine and durability. Its portability makes it perfect for touch-ups or travel, making salon-quality nails accessible anywhere.
Best For: beginners and DIY nail enthusiasts seeking a complete, portable gel manicure kit for at-home use and on-the-go touch-ups.
Pros:
- Includes a variety of trendy gel polish colors plus essential manicure tools, offering a comprehensive DIY kit.
- Compact, portable UV LED lamp cures gel polish quickly, making it ideal for travel and convenience.
- Easy-to-follow instructions suitable for beginners to achieve professional-looking results.
Cons:
- The UV LED lamp is plug-in only and not wireless, which may limit convenience during use.
- Requires proper nail preparation and curing times to ensure optimal durability and finish.
- Limited color options may not satisfy users seeking a broader or more customizable palette.
Factors to Consider When Choosing a Gel Nail Kit for Beginners
When selecting a gel nail kit, I focus on ease of use and clear application instructions to guarantee a smooth experience. I also consider the variety of colors and lamp compatibility to match my style and equipment. Finally, I check ingredient safety to avoid harmful chemicals and make sure the kit suits my needs as a beginner.
Ease of Use
Choosing a gel nail kit that’s easy to use can make a big difference, especially for beginners. Look for kits with clear, step-by-step instructions to guide you through each stage, reducing confusion. Easy-to-handle tools and minimal equipment requirements help prevent frustration and make the process more accessible. Kits with pre-measured or simplified application steps mean you don’t need advanced nail art skills or prior experience. A user-friendly UV or LED lamp with automatic sensors and multiple curing modes streamlines the curing process, saving time and effort. Additionally, organized packaging with clear labels makes it easier to identify and handle each product. Overall, a focus on ease of use guarantees a smoother, more enjoyable experience, helping you achieve professional-looking nails at home.
Color Variety
A wide variety of colors in a gel nail kit gives beginners the freedom to explore different styles and experiment with creative designs. Having multiple shades means I can try bolds, neutrals, and everything in between without needing to buy additional polish. This versatility allows me to match my nails to any occasion, whether casual or formal. Plus, a good color selection helps me build confidence in my skills, as I can find shades I love and develop my own style. It also offers better value, since I don’t have to make extra purchases later on. Overall, a broad color range makes the whole experience more fun, flexible, and cost-effective, helping me achieve salon-quality results from the comfort of my home.
Lamp Compatibility
Selecting a gel nail kit with a compatible lamp is essential for achieving professional-looking results at home. First, check if the lamp works with the gel polish included—UV or LED lamps are common, but they must match the gel type. Consider the lamp’s curing modes and timers to match your preferred nail routines, offering flexibility. The size and design should fit your hand comfortably, and features like automatic sensors add convenience. Power output and curing time directly impact how quickly and thoroughly your nails cure, ensuring longevity. Finally, verify that the lamp’s voltage and plug type align with your country’s electrical standards to avoid issues. Choosing a compatible lamp helps you achieve flawless, long-lasting nails with ease.
Ingredient Safety
When picking a gel nail kit, prioritizing ingredient safety is essential to protect your health and achieve beautiful results. I always look for kits that use natural, non-toxic, and low-odor ingredients, which make application and removal safer and more comfortable. It’s important to verify that the gel polish contains substances approved for cosmetic use, like safe resins and pigments. I avoid products with harmful chemicals such as Formaldehyde, Toluene, and DBP, since these can cause irritation or health issues. Some kits also include nourishing ingredients or vitamins to support nail health over time. Carefully reading labels and product descriptions helps ensure I choose professional, salon-grade formulas that are skin-friendly and safe for regular use. Safety should always come first.
Application Instructions
Have you ever wondered why some gel manicures last longer than others? The key lies in proper application. Always follow the recommended curing times and layer instructions to guarantee the gel adheres well and stays durable. Before applying, lightly buff your nails to remove shine and create a rough surface, which helps the gel stick better. When applying the polish, use thin, even layers to avoid bubbles and uneven curing—thick coats can cause problems. Make certain to use the designated base and top coats for maximum longevity and a professional finish. Each layer should be cured under a UV or LED lamp for the specified time, usually 30 to 60 seconds, to fully dry and harden the gel. Proper technique makes all the difference in your manicure’s durability.
Price and Value
Choosing the right gel nail kit involves finding a balance between price and quality. I look for kits that offer good value for money, including essential items like base and top coats, a reliable UV or LED lamp, and a decent variety of colors. While higher-priced kits might feature more durable gels and professional-grade equipment, basic kits can still deliver great results for beginners at a lower cost. I also compare the number of tools and colors included relative to the price to ensure I’m getting thorough coverage. Customer reviews are helpful—they reveal if the features and durability justify the expense. Ultimately, I want a kit that provides quality and functionality without overspending, giving me the best bang for my buck as I learn.
Frequently Asked Questions
How Long Do Gel Nails Typically Last With These Kits?
Gel nails typically last me about two to three weeks when I use a good kit and follow proper application techniques. The longevity depends on factors like how well I prep my nails, the quality of the gel, and how often I do daily activities that could cause chipping. I always make sure to seal the edges and use a top coat to extend their life.
Are These Gel Nail Kits Suitable for Sensitive Skin?
Honestly, I was initially worried about skin sensitivities, but many gel nail kits are formulated with hypoallergenic ingredients, making them suitable for sensitive skin. I always check the labels for potential irritants before trying. If you’re cautious, doing a patch test first can save you from surprises. Overall, with the right product and proper application, these kits can be safe and enjoyable even for sensitive skin types.
Can These Kits Be Used on Toenails?
Yes, you can definitely use these gel nail kits on your toenails. I’ve done it myself, and it works great! Just make sure to follow the instructions carefully, especially when it comes to prepping the toenails and curing times. Keep in mind that toenails are thicker, so you might need a slightly longer curing time. Overall, it’s a simple way to get salon-quality pedicures at home.
Do I Need Additional Tools or Accessories?
You might feel overwhelmed at first, but don’t worry—most kits come with everything you need. While some tools like cuticle pushers or nail files can enhance your results, they’re usually optional. I’ve found that starting with the basic kit allows you to learn and perfect your technique before investing in extras. Trust me, with a little practice, you’ll be creating salon-quality nails right at home—no extra tools required initially.
How Do I Safely Remove Gel Nails at Home?
To safely remove gel nails at home, I start by filing the top layer gently to break the seal. Then, I soak cotton balls in pure acetone, place them on each nail, and wrap them with aluminum foil. After about 10-15 minutes, I carefully lift the gel with a orangewood stick. I avoid force to prevent damage—patience and gentle care are key!
Conclusion
No matter which kit you choose, remember that practice makes perfect, patience leads to progress, and confidence turns nails into art. Whether you start with a simple set or go all out with a colorful collection, the key is to enjoy the process and embrace your unique style. With the right tools and a little bit of dedication, you’ll be creating salon-quality nails at home that make you feel fabulous every time.